Groupwise Client Upgrade

For Clawson Office Personnel utilizing the Groupwise Client.

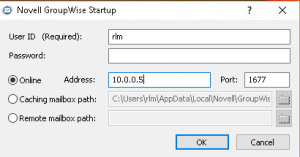
To upgrade your Groupwise Client, click the Groupwise icon on your computer.  The Groupwise Client will attempt to connect to the post office and will fail.  This is expected (as we have moved the Post Office)  Your screen will look similar to the following:

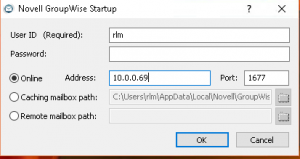
Next to the “Online” radio button, change the Address to: 10.0.0.69.  You do NOT need to enter a password or any other information.  Change the IP address only.

A dialog box opens asking if you wish to upgrade.  Select Yes and select all of the default prompts.  Be Patient, this may take a few minutes.

You client has now been upgraded and will connect to the new Post Office.

Groupwise Status

Groupwise has been migrated and upgraded.  The Groupwise Mobility Server is fully functional (i.e. the native mobile app).  Groupwise WebAccess should be operational soon, as we are waiting for Lightbound to make an IP change to point to the new WebAccess server.  For Office Personnel who utilize the Groupwise Client, I will be posting an article on the auto upgrade process for your new computer client software.

Facebook to warn you of targeted attacks – check this security setting anyway

by John Zorabedian on October 20, 2015

https://nakedsecurity.sophos.com/2015/10/20/facebook-to-warn-you-of-targeted-attacks-check-this-security-setting-anyway/

Facebook has announced that it will notify users it suspects are being targeted by nation states and urge them to take extra security precautions.

Alex Stamos, Facebook’s chief security officer, explained the new notifications in a 16 October blog post, saying users will only receive the warnings if Facebook has strong evidence suggesting they are being targeted by nation-state sponsored attackers.

If the social network believes you are under attack from state-sponsored hackers, it will show a pop-up message in your feed explaining that you may have been targeted.

The message asks, but does not require, those users to turn on an extra layer of protection for their account called Login Approvals.

Stamos said Facebook “will have always taken steps to secure accounts that we believe to have been compromised,” but will show the warning to users because these attacks may be “more advanced and dangerous” than others.

This is how the message looks in the desktop version of Facebook:
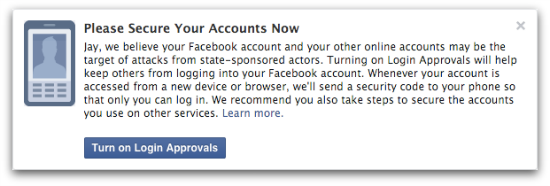
Jay, we believe your Facebook account and other online accounts may be the target of attacks from state-sponsored actors. Turning on Login Approvals will help keep others from logging into your Facebook account. Whenever your account is accessed from a new device or browser, we'll send a security code to your phone so that only you can log in. We recommend you also take steps to secure the accounts you use on other services.

Because of the persistence of state-sponsored attackers, anyone whose Facebook account is under attack by a nation state is probably also being targeted on other services, so Facebook encourages securing those accounts as well.

Google began sending similar warnings to Gmail users back in 2012.

Just like Google, Facebook says it can’t reveal how or why it suspects state-sponsored attacks, for fear of giving away useful information to attackers about security methods.

Nation states may target individuals for political or national security reasons, but also attack individuals to gain access to their employers’ intellectual property or customer data, for example.

Countries like North Korea and China have been suspected of sponsoring attacks on private companies.

Hackers affiliated with the Chinese military were indicted by the US two years ago for allegedly hacking into several US steel companies.

The US claims the Chinese hackers used phishing emails and malware to gain access to email accounts of company officials, in order to steal information that would benefit Chinese state-run steel companies in trade disputes.

Targeted or not, extra security is always a good idea

Even if nation states aren’t likely to target you personally, it would be a shame to fall into the trap of thinking “no one’s interested in little old me.”

As Naked Security expert Paul Ducklin pointed out in a post describing all the bad excuses we make for neglecting our security, we are all on cybercriminals’ radars:

We're all in the sights of cybercrooks somewhere, and we owe it to ourselves and to everyone else to do the best we can to thwart them.

Today’s cybercriminals are typically in the business of making money, and to do that they want to compromise as many users and devices as possible.

One method for attackers to gain access to your accounts is to implant malware on your computer that can steal passwords.

Malware of this sort can get on your computer in various ways, such as through boobytrapped email attachments, or by visiting a malicious website harboring malware that downloads automatically (called a drive-by download).

Malware can also spread via Facebook.

We recently learned of a hacker using a type of malware called a “Facebook Spreader” to compromise Facebook accounts via malicious links in Facebook chat messages.

In August, a US-based hacker named Eric Crocker pleaded guilty to spreading Facebook malware to hijack thousands of accounts in order to send spam.

Just like Facebook recommends, we think it’s a good idea to add extra layers of security to your accounts, such as login verification or two-factor authentication.

Even if you’re not likely to be a target of a nation state, that’s no reason to become easy prey for common cybercriminals.

How to turn on Facebook Login Approvals

When you turn on Facebook Login Approvals, you’ll need to enter a special one-time code whenever you log into Facebook from an unrecognized device or browser.

You’ll receive the codes on your phone as a text message, so Facebook needs your mobile phone number to send Login Notification alerts.

Login Approvals are similar but more secure than Login Notification, which alerts you when your account is accessed from a new device or browser, but without requiring a code.

To turn on Login Approvals:

  1. Click the down arrow at the top right of any Facebook page
  2. Go to Settings > Security
  3. Click on Login Approvals
  4. Check the box and click Save Changes

Finally, once you’ve set that up, make sure you change this setting so you can’t be searched for by phone number.

Greenwood 4th Quarter Safety Meeting

Our 4th Quarter safety meeting will be held at Jonathan Byrd’s Cafeteria located just off the Greenwood / I-65 exit beginning at 7am on Thursday October 22, 2015.

IU Health will be on site performing Flu vaccines during check in.

Any employee who does NOT want to receive a Flu vaccine, or will not be able to attend this meeting, please let me know as soon as possible.

We will be reviewing the new on line time sheet program, on line toolbox talks, and Kathy Hardey will be reviewing health insurance information for 2016 with us as well.

IOS9

Updates on Apple’s IOS9 included a free 90-day music service.  After your trial, your account will be charged $9.95/month.  Information on unsubscribing from the services may be found here:

https://support.apple.com/en-us/HT202039

IOS9 also enables WIFI-Assist by default, which utilizes your LTE connection if you have a weak WIFI signal.  Information on turning off WIFI-Assist may be found here:

http://reviews.gizmodo.com/ios-9s-wi-fi-assist-is-eating-my-cell-data-1733513159


Transfer content from an iPhone, iPad, or iPod touch to a new device

You can use iCloud or iTunes to transfer content from your current iPhone, iPad, or iPod touch to another device.

These instructions are for setting up a new iPhone from an iTunes backup. Full instructions on restoring from an iCloud backup may be found Transfer content from an iPhone, iPad or iPod touch to a new device.

Use iTunes

Back up your current device using iTunes. Then you can transfer the backup to your new device.

If you don’t encrypt your iTunes backup, Health and Activity data from your iOS device or Apple Watch won’t be saved.

Make an iTunes backup of your current device

  1. Connect your device to your computer.
  2. Open iTunes and make sure you have the latest version.
  3. Select your device.
  4. Save content that you downloaded from the iTunes Store or App Store: Click File > Devices > Transfer Purchases. Then wait for the transfer to finish.
  5. If you want to save Health and Activity data from your iOS device or Apple Watch, you’ll need to encrypt your backup: Select the box called Encrypt [device] backup and make a memorable password.Write down your password and store it somewhere safe, because there’s no way to recover your iTunes backups without this password.If you don’t need to save Health and Activity data, you can make a backup that isn’t encrypted. Just click Back Up Now.
  6. After the process completes, make sure that your backup finished successfully in iTunes Preferences > Devices. You should see the name of your device, along with the date and time that iTunes created the backup. If you encrypted your backup, you should also see   beside the name of your device.

Transfer your iTunes backup to a new device.

Transfer the iTunes backup to your new device

  1. Turn on your new device. A “Hello” screen should appear. If you’ve finished setting up your new device already, learn what to do.
  2. Swipe left to right on the “Hello” screen and follow steps until you see the Wi-Fi screen.
  3. Connect your iOS device to the computer that you stored your iTunes backup on.
  4. On the Wi-Fi screen on your iOS device, tap Connect to iTunes.
  5. Follow onscreen steps until you see the Apps & Data screen, then tap Restore from iTunes Backup > next.
  6. Enter your Apple ID and password.
  7. Choose a backup. Make sure it’s the right one by looking at the date and size of each. After you choose, the transfer starts.
  8. If you’re restoring from an encrypted backup, enter the password when asked.
  9. Wait for the process to complete. Then finish the remaining setup steps and sync your other content.

Finish up

Keep your device connected to your computer and use iTunes to sync any content that wasn’t in the backup. If possible, keep your device connected to Wi-Fi and plugged in to power until your cloud content downloads to your device. Cloud content includes anything stored in the cloud instead of your backup, like photos and music. This content will download automatically in the background. Depending on the amount of content, this could take a few hours or days to finish.

Transfer a backup to a device that you’ve already set up

To transfer a backup to a device you’ve already set up, you need to erase the device: Tap Settings > General > Reset > Erase All Content and Settings. This will erase any data that’s currently on your device. After you’ve erased it, your device will restart and you’ll see the “Hello” screen. Now you can transfer a backup to your device.

Back to top >

Get more help

Last Modified: